Restoring an Attix5 backup
The Attix5 Pro SE Backup Client GUI enables previously backed up data to be selected and restored by the user.
The following sections describe how to:
- Select data to restore
- Restore data
- Find specific backed up files
- Restore a backup selection
- Restore archived data
Selecting data to restore
In the Attix5 Backup Client GUI, on the Restore tab, you can browse a tree structure representation of all successful backups and their files and folders. The Restore tree gives you access to backed up files via two main nodes: Last Backup and Previous Backups.
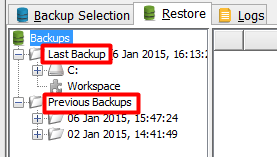
The Last Backup node contains the file/folder structure of the last successful backup and displays the date and time it occurred in parentheses "( )".
Note:
Restores done from the Last Backup node are typically faster than those done from the Previous Backups node as the Backup Client may be able to retrieve the data from the cache instead the Storage Platform.
When you expand the Previous Backups node, the Backup Client retrieves the list of previous backups from the Storage Platform and displays them in the tree.
Selecting data to restore from the last backup
To select and restore data from the last backup,
- Click the Restore tab.
- Expand the Last Backup node to view the files/folders.
- Include a single file by clicking the
 icon next to the file or by right-clicking the file name and then clicking Include. Each included file is displayed with a green icon
  .
.

- Include an entire folder by right-clicking the folder and then clicking Include. Each included folder is displayed with a green folder icon
 .
.
Note:
If an entire folder is included but you wish to exclude a particular file or subfolder within that folder, then right-click the file or subfolder icon, and then click Exclude. Excluded items are displayed with red icons ![]() for an excluded file, or
for an excluded file, or ![]() for an excluded folder. Included folders that have some files or subfolders excluded are green with a red tint
for an excluded folder. Included folders that have some files or subfolders excluded are green with a red tint ![]() .
.
Selecting data to restore from previous backups
To select and restore data from previous backups then,
- Click the Restore tab.
- Expand the Previous Backups node to connect to the Storage Platform and retrieve a list of all previous backup dates.
- Expand the relevant backup node, and then click the folder/directory containing the data.
- Include a single file by clicking the
 icon next to the file or by right-clicking the file name and then clicking Include. Each included file is displayed with a green icon
  .
.

- Include an entire folder by right-clicking the folder and then clicking Include. Each included folder is displayed with a green folder icon
 .
.
Note:
If an entire folder is included but you wish to exclude a particular file or subfolder within that folder, then right-click the file or subfolder icon, and then click Exclude. Excluded items are displayed with red icons ![]() for an excluded file, or
for an excluded file, or ![]() for an excluded folder. Included folders that have some files or subfolders excluded are green with a red tint
for an excluded folder. Included folders that have some files or subfolders excluded are green with a red tint ![]() .
.
Restoring data
After you have selected the files and folders to restore, you can start the restore process as described below.
- Start the restore process by either clicking Restore on the File menu,
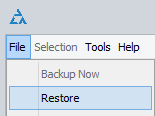
or by clicking the Restore button  on the toolbar.
The Restore Options dialog box appears.
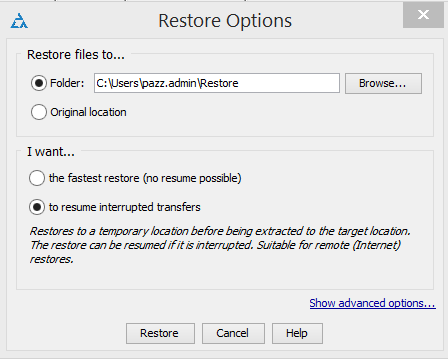
- In the Restore files to… section,
- Select Original location to restore the files to the same location that they were backed up from, or
- select Folder and then browse to a new location.
Caution:
If Original location is selected, the restored files will overwrite any existing files with the same name in that location. A warning will, however, be displayed before the Backup Client overwrites any files.
- In the I want... section, depending on your requirements, select either,
- the fastest restore (no resume possible) or
- to resume interrupted transfers
Note:
Selecting, to resume interrupted transfers restores the data to a temporary location before extracting it to the target location. This restore can be resumed if it is interrupted. This is suitable for remote (Internet) restores where the communicating link may not be robust.
- Click the Show advanced options... link to display the advanced restore options.
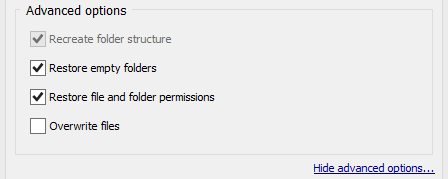
- You can now specify the rest of the restore options by selecting or clearing the following check boxes:
- Recreate folder structure – This option is selected by default. It instructs the Backup Client to recreate the folder structure in the restore folder. Clear this check box if you wish to restore the files to a single folder.
Note:
If restoring files from different folders with the same file names, you need to recreate the folder structure to prevent overwriting the files.
- Restore empty folders – This option is only available if the Recreate folder structure option is selected. You can select this check box to recreate empty folders.
- Restore file and folder permissions – Clear this check box if you do not wish to restore the file and folder permissions. You would typically only select this option after a complete server failure (to restore files before user accounts are re-created).
- Overwrite files – Select this check box if you do not want the Backup Client to prompt you before overwriting an existing file.
- Click Restore.
Note:
You can view restore logs on the Logs tab. Restore log dates are displayed in green.
Finding files in backups
To find a specific backed up file, it may be easier to use the Find function than to browse the Restore tree. You have the option to scan only your last backup (locally), or you can connect to the Storage Platform and search through previous backups.
Searching for a file in your latest backup
- On the File menu, click Find Files in Backups.
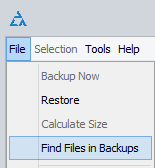
Alternatively, click the Find button  on the toolbar.
The Find Files in Backups page opens.
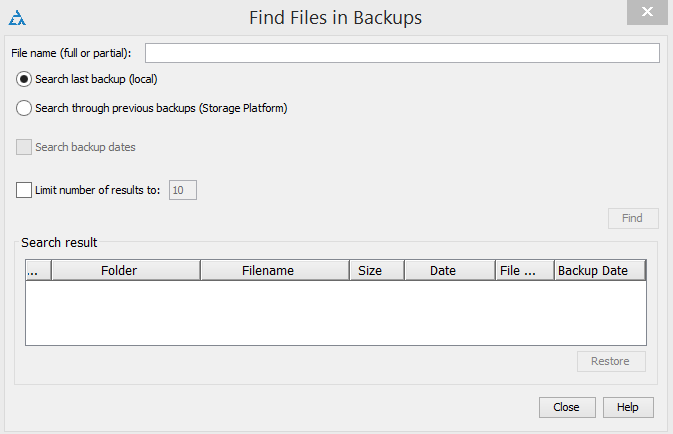
- In the File name box, type the file name, or part thereof, and then click Find.
Note:.
You may use the * and ? wildcards for advanced search queries.
The Backup Client will display a list of all files in the last backup containing the search word in the filename
Searching for a file in previous backups
- On the File menu, click Find Files in Backups.

Alternatively, click the Find button on the toolbar.
The Find Files in Backups page opens.
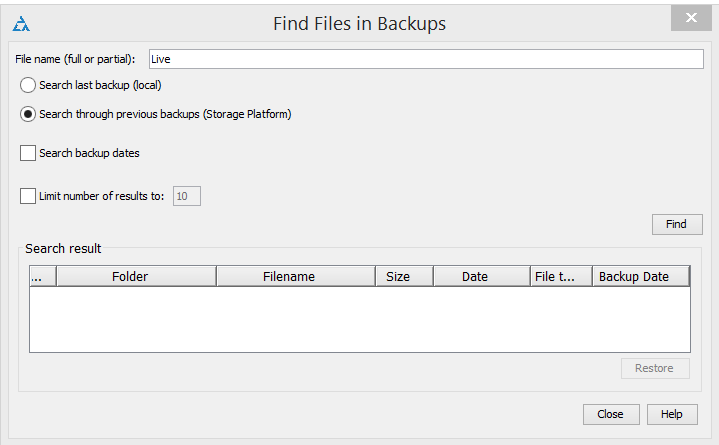
- In the File name box, type the file name, or part thereof.
Note:.
You may use the * and ? wildcards for advanced search queries.
- Select the Search through previous backups (Storage Platform) check box.
- If you wish to limit the search to particular dates, select the Search backup dates check box and then use the Start date and End date boxes to specify a time period.
Note:
If Search backup dates is selected, the backup date is used for the search instead of the file create or file modified date.
- To limit the number of results that display, select the Limit number of results to check box and then type a number in the box provided.
- Click Find.
The Backup Client will display a list of all files in the selected previous backups period containing the search word in the filename
Restoring files from the Find Files in Backup dialog box
Files may be restored directly from the Find Files in Backup dialog box, following a successful search. To do this,
- In the search results list, include the files to restore by clicking the icons next to the file names or by right-clicking each file name and then clicking Include.

- Click the Restore button.
The Restore Options dialog box appears, enabling you to specify the location in which to save the restored files. See Restoring Data for further details.
Restoring a backup selection
By default, with every backup performed, a copy of the backup selection is saved on the Storage Platform. This enables you to restore, not only your backed up files and folders, but the selection you used to back them up as well.
Note:
This is especially useful in disaster recovery cases, as it enables you to restore your entire backup setup to perform exactly as it did at the last backup.
To restore a backup selection,
- Click the Restore tab.
- Expand the relevant backup folder, and then click the Workspace node.
- In the right-hand pane, click the icon next to the name of the backup set to include it for restore. If you have not enabled multiple backup sets, include the only entry that displays.

- Click the Restore button on the toolbar.
- Select the appropriate restore options. (See "Selecting data to restore" earlier in this article.)
- Click Restore.
The backup selection will be restored to the location specified in the restore options.
Restoring archived data
Attix5 Pro allows Backup Administrators to archive Backup Clients' data to tape or another disk drive using the Hierarchical Storage Management (HSM) feature. Once data has been archived, the backups will display in the Restore tree as greyed out folders, allowing you to browse the file/folder structure of the backups. However, if you try to restore archived data, you may receive a message informing you that the data has been archived to secondary storage, as illustrated in the screenshot below.
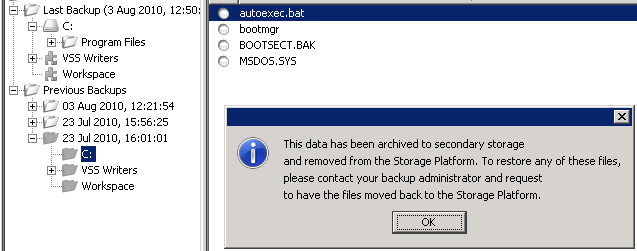
Note:
Grey folders indicate archived data. However, if you do not see these folders in the Restore tree, it does not mean that no archived backups are available. In such cases, please consult your Backup Administrator for further details about archived backups.
You can access archived data by requesting your Backup Administrator import the HSM data to the Storage Platform. Once the data has been imported, it will be available for restore in the same manner as all other backups.


