Navigating the Call Recorder Archive Tool
The Archive Tool
The Archive Tool allows users to archive call recordings to ISO images before they are automatically deleted. For safe keeping, these image files can be burned to CD/DVD at the convenience of the user.
This article describes how to navigate the tool and use the available features and functions. An example of Archive Tool use is included at the end of the article in the section entitled, Running an archive job.
If you have not yet downloaded and installed the Archive Tool then please refer to knowledge article "Installing the Call Recorder Auto Archive Tool" before proceeding with this article.
Navigating the Archive Tool
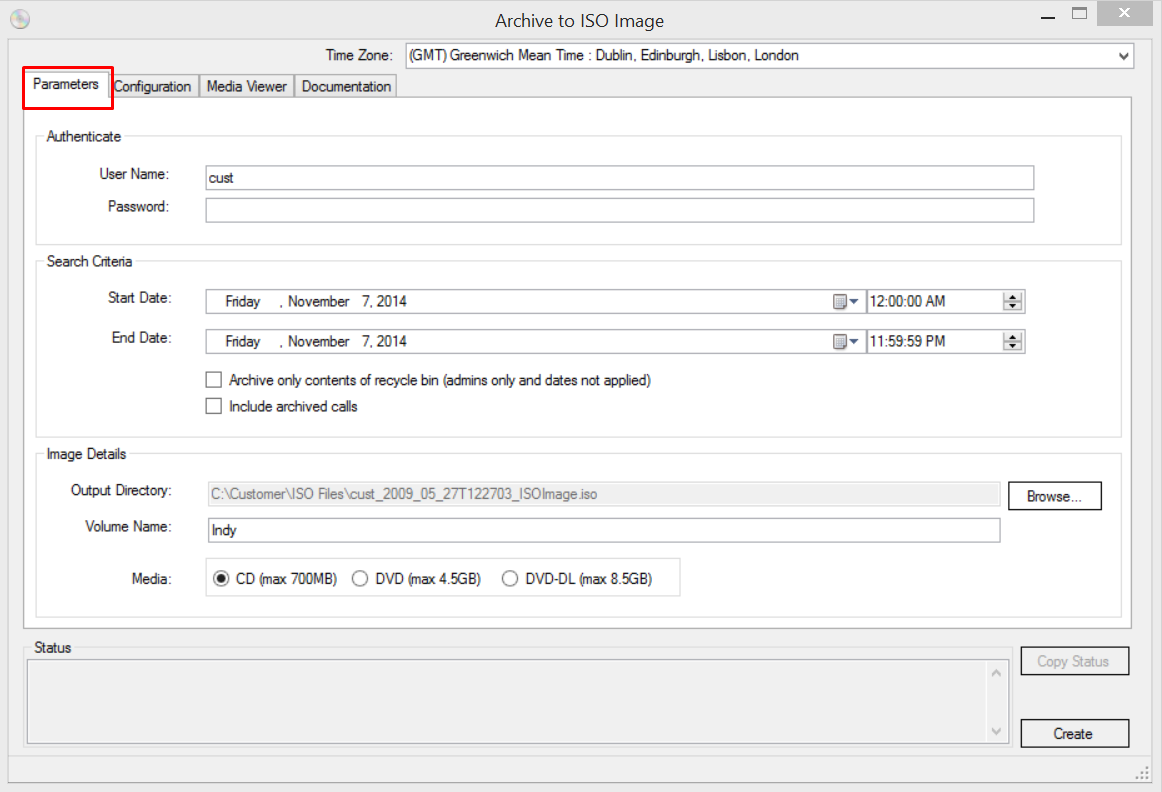
With the Archive Tool installed on your desktop/laptop, locate and open the Archive Tool application. The Archive to ISO Image window appears, open at the Parameters tab.

The Archive to ISO Image Window contains four tabs;
- Parameters
- Configuration
- Media Viewer
- Documentation
These tabs are explained in more detail in the following paragraphs.
Parameters
To set up auto-archiving Parameters, complete the following fields as required:
- Time Zone - This is the time zone you wish the search to be based on, for example "search for calls that were made from 08:00 to 17:00, (GMT) Greenwich Mean Time"
- User Name - Authorized user (your Call Recorder portal username)
- Password - User password (your Call Recorder portal password)
- Start Date - Date to begin search, includes start time
- End Date - Date to end search, includes end time
Note:
Date range limited to max 90 days.
- Archive Recycle Bin - When checked, only calls in recycle bin will be archived; the date option is ignored and disabled
- Include Archived Calls - When checked, downloaded records will include calls that have been previously archived
- Output Directory - The directory where the completed ISO file will be stored in. Accept the default location, or use the Browse button to select an alternative location to stiore the completed ISO file.Note that the file name will be created automatically using the following format:
- username_yyyy_mm_ddThhmmss_[custom name].iso
- Volume Name - The name that will be seen when the image is opened on a CD/DVD drive.
- Media - Output type; choose between CD, DVD and DVD-DL formats
Configuration

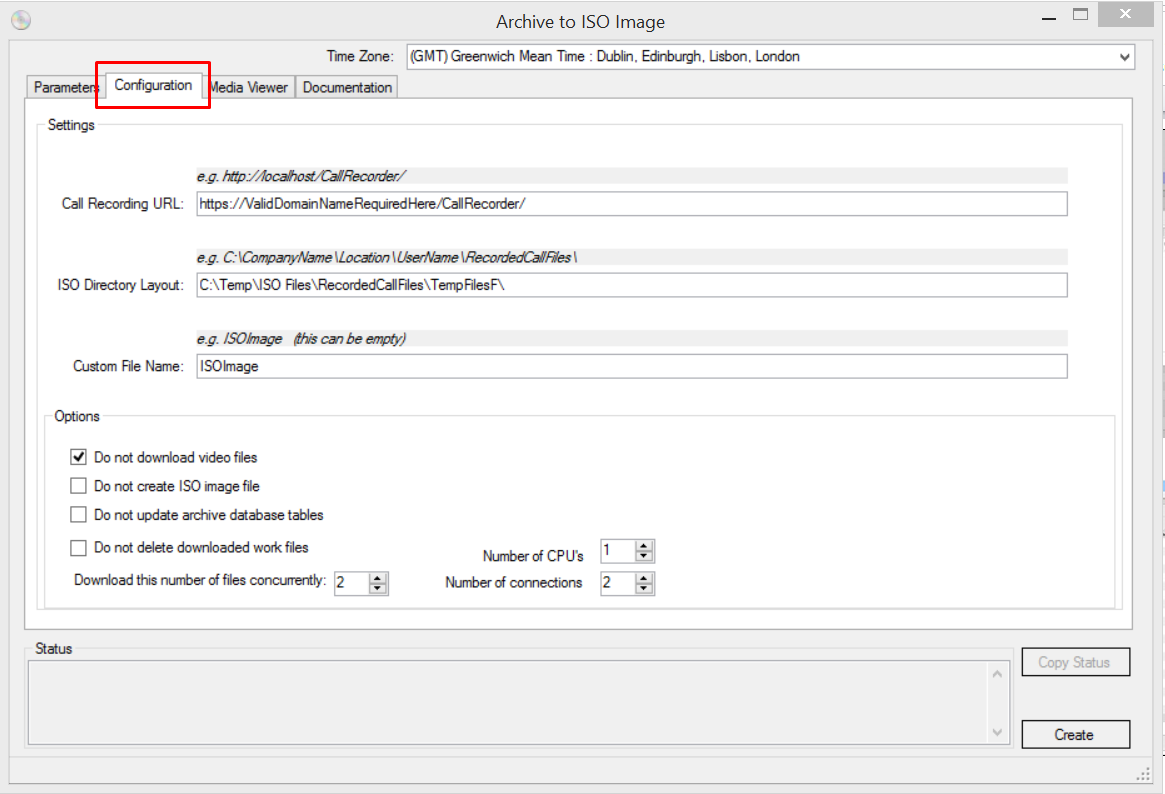
The Configuration tab contains the following settings that may be modified as required:
- Call Recording URL - The location of the archive web service; typically the service provider address – the Call Recorder portal URL
- ISO Directory Layout - Describes the directory structure that will be applied to the ISO image - note that this directory description is also be used as the work directory for storing the audio\video files during processing
- Custom File Name - This is an optional value that will be added to the ISO filename created by the application.
- Do not download video files - Select this to ignore downloading video files
- Do not create ISO image file - Select this to ignore creating an ISO image
Note:
When selected, the Do not create ISO image file option will download all calls as individual MP3 files.
- Do not update archive database tables - Select this to ignore updating the service provider system database; always choose this when are testing
- Do not delete downloaded work files - Select this to ignore deleting files downloaded in work directory
- Download this number of files concurrently - The number of files to download concurrently
- Number of CPUs - The number of CPUs on the local computer
- Number of connections - The number of concurrent connections to the web server
Media Viewer

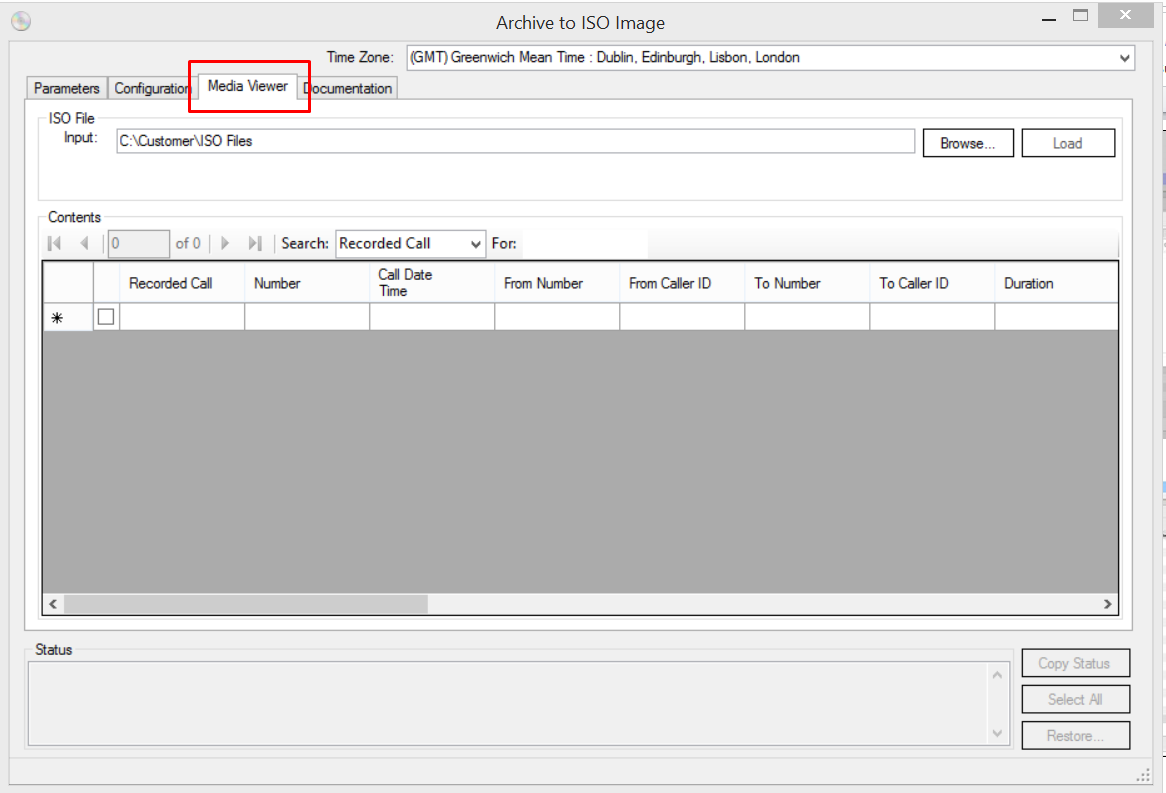
The Media Viewer tab provides options for viewing ISO images. It can also be used to restore previously archived calls
The following options are available:
- Input - This is the location of the ISO file (created by this tool) that you wish to view. Accept the default location, or use the Browse button to select an alternative location for the ISO Image file you wish to view. When you create an ISO, the last one created will be rendered in the Media Viewer.
- Load - Select this to manually load an ISO in the viewer.
- Search – Select, from the drop-down list, the field you wish to search
- For - Enter the data (keyword) you wish to find
Restoring an archived recorded call
To restore an archived call, from the Archive Tool, Media Viewer tab,
- In the Input field, select the location of the file that you previously archived.
- Click Load.
- Select the calls you wish to restore from the archived calls that appear in the lower part of the window.
- Click Restore.
Documentation
Contains documentation to help setup and use the Archive Tool.
Running an archive job
From your desktop,
- Open the Archive Tool application.

In the Parameters tab,
- Set parameters as required. Refer to previous section, Parameters, for further information.
- Click the Configuration tab to open the Configuration page.

In the Configuration tab,
- Set configuration settings as required. Refer to previous section, Configuration, for further information.
- Return to the Parameters tab.
In the Parameters tab,
- Click Create to start the archive job.
Once the archive job has been completed, the archived data may be viewed or restored in the Media Viewer tab. Refer to previous section, Media Viewer, for further information.


